Easiest Solution to Convert DVD for Uploading onto Facebook
Do you have a large number of DVD collections and would like to upload DVD to Facebook so as to share it with your friends overseas? Here is an instructional article on showing how to share and upload DVD to Facebook by ripping DVD to a Facebook-preferred video format.
You can set your players so that when a Facebook member shares a video from a Video Cloud player by clicking the Facebook button from the player's viral sharing menu, or by pasting the link from the copy link control, shared videos play within the Facebook interface so that friends can watch videos on the sharer's Facebook status, just as they watch shared YouTube videos. But , when you are trying to upload DVD to Facebook, you may get into trouble since Facebook doesn't support DVD uploading.

To solve the trouble, a quick fix is to convert DVD to Facebook friendly video. Brorsoft DVD Ripper for Mac would be a good choice for converting DVD to Facebook video on Mac (including El Capitan and Yosemite).
It is easy for you to rip DVD movies to Facebook videos with this DVD ripping software. Besides the basic functions, it also let you clip any favorite videos from the DVD movies and upload it to Facebook. You can also adjust the video quality by changing the parameters, video frame rate, etc. If you're using a Windows PC, simply turn to best DVD ripper for Windows to convert DVD to Facebook supported format on Windows(Windows 10 included).
READ MORE: How to Upload DVD to YouTube | How to Upload DVD to Dropbox
Download DVD to Facebook converter:
 (Note: Click here for OS X 10.5)
Guide: How to Convert DVD to Facebook Video on Mac OS X
Step 1. Load DVD movies
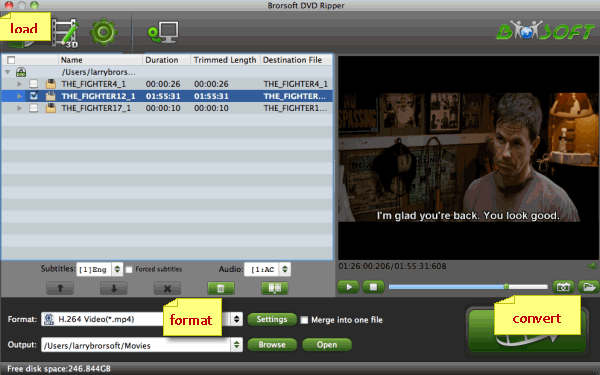
Insert the DVD disc into your computer's DVD drive and run the Mac DVD Ripper. You can click the "Load DVD" button to load the DVD files to the program. DVD ISO/IFO, VIDEO_TS folder are supported also.

Step 2. Specify output format
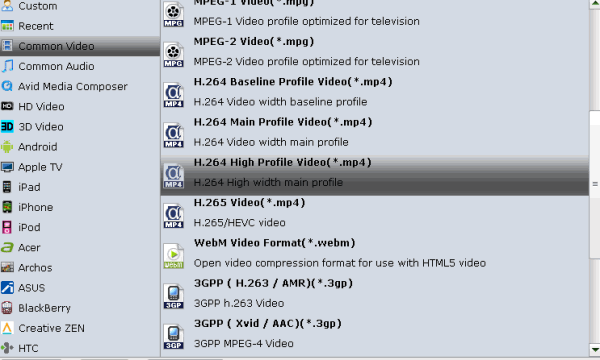
From the drop-down list of "Profile", navigate to the Common Video category. From the sub-category, choose MP4 or MOV as the output format.

3. Advanced settings
If you wanna some advanced settings, you can click "Settings" icon to adjust the video, audio parameters bitare, frame rate, sample rate, audio channel, etc. Plus, you can click "Edit" button to do some editing work cropping, trimming, settings effect, adding subtitles.
Note: Keep in mind that videos must be less than 45 minutes long and smaller than 1.75 GB. You can modify the video settings and trim your video to get a decent file before uploading to Facebook.
4. Start converting DVD to Facebook
When all these settings are ready, you can click the "Convert" button to begin the DVD to Facebook conversion. When the ripping is done, you can click on "Open" button to locate the ripped videos. Now you can freely share the video files on your Facebook with more people.
5. Add converted DVD files to Facebook
Click the icon at the top of your News Feed or Timeline. Then, click Upload Photos/Video and choose a video file from your computer. At last, click Post to start uploading DVD to your Facebook.
Your video will need to process before others can see it on Facebook. When it's ready to view, you'll get a notification. Go to the video and click Edit to add a title, tag friends, choose a thumbnail and more.
More Guides:
Rip DVD to Android
Import DVD to iTunes
Convert ISO to MP4
Rip DVD with Subtitles
Rip DVD in Windows 8
Convert DVD to Facebook friendly video
Solution to Playing AVI Files on Samsung TV
How to convert MKV to M4V for Apple TV 3
Can i Play MKV files with Android Phones or Tablets ?
Soltuion to Convert MOV, FLV to MP4 for Samsung TV
Load DVD films to Samsung Galaxy Note 5 for Enjoyment
You can set your players so that when a Facebook member shares a video from a Video Cloud player by clicking the
 Facebook button from the player's viral sharing menu, or by pasting the link from the copy link control, shared videos play within the Facebook interface so that friends can watch videos on the sharer's Facebook status, just as they watch shared YouTube videos. But , when you are trying to upload DVD to Facebook, you may get into trouble since Facebook doesn't support DVD uploading.
To solve the trouble, a quick fix is to convert DVD to Facebook friendly video. Brorsoft DVD Ripper for Mac would be a good choice for converting DVD to Facebook video on Mac (including El Capitan and Yosemite).
It is easy for you to rip DVD movies to Facebook videos with this DVD ripping software. Besides the basic functions, it also let you clip any favorite videos from the DVD movies and upload it to Facebook. You can also adjust the video quality by changing the parameters, video frame rate, etc. If you're using a Windows PC, simply turn to best DVD ripper for Windows to convert DVD to Facebook supported format on Windows(Windows 10 included).
READ MORE: How to Upload DVD to YouTube | How to Upload DVD to Dropbox
Download DVD to Facebook converter:
 (Note: Click here for OS X 10.5)
Guide: How to Convert DVD to Facebook Video on Mac OS X
Step 1. Load DVD movies
Insert the DVD disc into your computer's DVD drive and run the Mac DVD Ripper. You can click the "Load DVD" button to load the DVD files to the program. DVD ISO/IFO, VIDEO_TS folder are supported also.

Step 2. Specify output format
From the drop-down list of "Profile", navigate to the Common Video category. From the sub-category, choose MP4 or MOV as the output format.

3. Advanced settings
If you wanna some advanced settings, you can click "Settings" icon to adjust the video, audio parameters bitare, frame rate, sample rate, audio channel, etc. Plus, you can click "Edit" button to do some editing work cropping, trimming, settings effect, adding subtitles.
Note: Keep in mind that videos must be less than 45 minutes long and smaller than 1.75 GB. You can modify the video settings and trim your video to get a decent file before uploading to Facebook.
4. Start converting DVD to Facebook
When all these settings are ready, you can click the "Convert" button to begin the DVD to Facebook conversion. When the ripping is done, you can click on "Open" button to locate the ripped videos. Now you can freely share the video files on your Facebook with more people.
5. Add converted DVD files to Facebook
Click the icon
 at the top of your News Feed or Timeline. Then, click Upload Photos/Video and choose a video file from your computer. At last, click Post to start uploading DVD to your Facebook.
 Your video will need to process before others can see it on Facebook. When it's ready to view, you'll get a notification. Go to the video and click Edit to add a title, tag friends, choose a thumbnail and more.
More Guides:
Rip DVD to Android
Import DVD to iTunes
Convert ISO to MP4
Rip DVD with Subtitles
Rip DVD in Windows 8
Convert DVD to Facebook friendly video
Solution to Playing AVI Files on Samsung TV
How to convert MKV to M4V for Apple TV 3
Can i Play MKV files with Android Phones or Tablets ?
Soltuion to Convert MOV, FLV to MP4 for Samsung TV
Load DVD films to Samsung Galaxy Note 5 for Enjoyment
Comments
Post a Comment